Don't judge. But here is the before shots of our Master Bedroom:
The first three are from the day we toured the house. The last one is from the day I started this redo. Yup, we lived with it like this (minus the paint supplies) for a year!
Step One: Choose a paint color. This is the part that took a year.

No swatch was left unexplored. Actually, three more went up before we landed on the right color.
Step Two: Paint. Or at least paint the wall that the new TV is going to go on. Note the number of primed-over swatches. Again: it took a year.
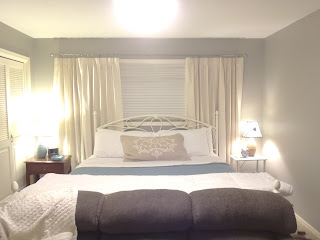
Yay! New color! Yes, it is a neutral. No, I don't typically do neutral walls. But since I have a love affair with bedding, it's cheaper and easier if I paint a neutral color in the bedroom so that I can trade out the linens to re-style the bedroom easily.
Yeah. I really did just paint the wall that the TV was going on.
Step Three: Install new TV. (Happy Birthday to Mike 2012)
Handy hubby to the rescue.
Really, he was just programming the TV, but doesn't it look like he is Tebowing?
Step Four: Shop a killer sale at Bed Bath and Beyond:


Bedskirt, Duvet, and Quilt all for $80 TOTAL! Woo to da HOO!
Step Five: Repaint cruddy old night stand that I bought for $3 over 8 years ago at a secondhand store. It's sturdy, and I still like the simple design and details. This is Sherwin Williams "Rainwashed" which I totally love.
Before
My lamp was a $13 Wal-Mart Clearance find. The lamp shade I picked up at Garden Ridge (aka my new favorite store).
So pretty! Oh-and that is a 13 cent ceramic tile with a stamp and Mod Podge on it enjoying it's new life as a coaster.
Step Six: Paint the rest of the walls, get a couch and mattress delivered, hide TV cords, clean, clean, clean. Window Treatments!
We're leaving the small window with blinds only. Because it is adjacent to the bathroom door, the curtains tended to get in the way and took up to much physical and visual space.
Those are the same drapes as before! Remember BEFORE? No? Here ya go:
See? I just took down that weird inverse double traverse R2D2 rod and put a normal pole rod and hung the curtains a good 3 feet on either side of the window. It made the window and ROOM look and feel so much bigger! Awesome opossum.
Mike's nightstand I picked up at the Phillips Hotel when it went out of business for $7. Freakin' rocks.
Well, what do you think?


